

Open the Graph Editor after a bake or a Mixamo import and the problem is obvious: a key on every frame, tangents that jitter, and a rotation channel that jumps 360 degrees for no visible reason. Curves like that cannot be edited by hand. Maya ships everything needed to fix them, but the order you run the tools in matters, and two of them will quietly damage the animation if you get it wrong.
The order that works: fix the rotations, delete the curves that do nothing, reduce the keys, and only then smooth whatever is still noisy.
Before you touch anything
Save an incremental copy of the scene. Then, in the Graph Editor (Windows → Animation Editors → Graph Editor), select the curves you are about to change and choose Curves → Buffer Curve → Snapshot, and turn on View → Show Buffer Curves. The original curve stays visible as a ghost behind the one you edit, so you can see exactly what each filter did. Curves → Swap Buffer Curve flips between the two.
Step 1: fix rotation flips with the Euler Filter
A baked rotation often contains the same pose written two ways: 179 degrees on one frame, -181 on the next. Each frame looks right in the viewport, but anything that interpolates between them, including every key-reduction tool, sees a 360 degree spin. So this step comes first.
- Select the controls.
- In the Graph Editor outliner, select Rotate X, Rotate Y and Rotate Z together. The filter works on the three channels as a set.
- Choose Curves → Euler Filter.
The jump disappears and the pose in the viewport does not change, because the filter only picks a different way of writing the same rotation. Autodesk's Graph Editor overview adds one detail worth knowing: the filter is always applied to entire curves, not to a selected segment.
Step 2: delete static channels
A bake keys every channel, including the ones that never move. Select the controls and choose Edit → Delete by Type → Static Channels in Maya's main menu. Curves whose value never changes are removed; the attribute keeps its value. A baked character usually carries plenty of them, scale channels above all, and clearing them out makes the Graph Editor readable before you have reduced a single key.
Step 3: reduce the keys
Maya has two tools for this, both in the Graph Editor's Curves menu.
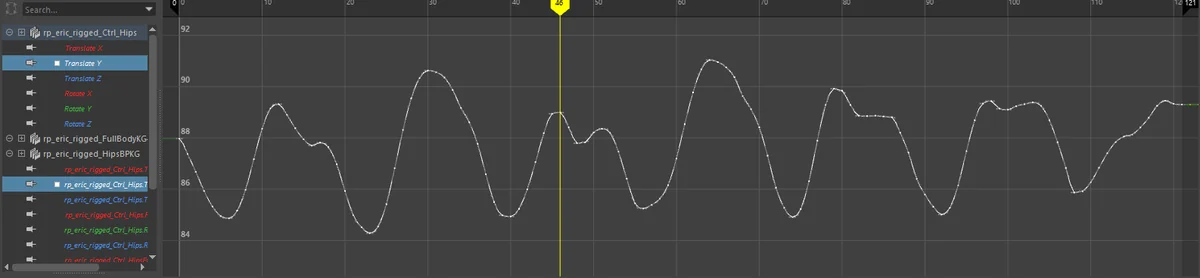
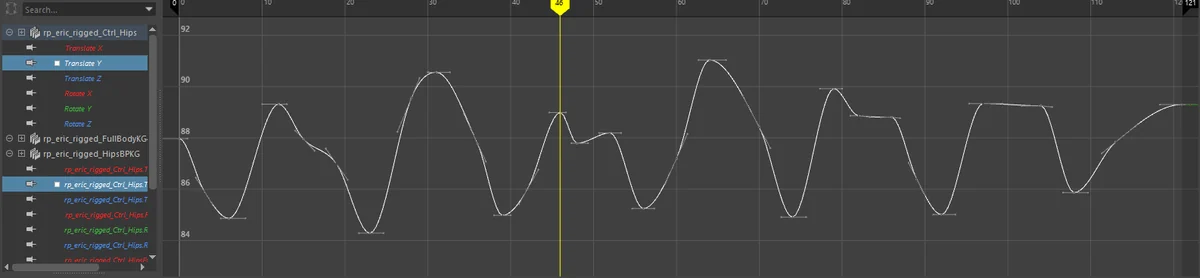
Simplify Curve. Select the curves, open the option box for Curves → Simplify Curve and set:
| Option | Setting | Why |
|---|---|---|
| Simplify Method | Dense Data for bakes and mocap, Classic for hand-keyed curves | Autodesk describes Dense Data as built for data with a key on every frame |
| Time Tolerance | 0.05 (the default) | How far key timing may be averaged, in seconds |
| Value Tolerance | 0.01 (the default) to start | How far a value may drift, in your working units |
Those names and defaults are from Autodesk's Simplify Curve options. Value Tolerance is the one to move. It is measured in working units, so with Maya's default units the same 0.01 means a hundredth of a centimetre on a translate curve and a hundredth of a degree on a rotate curve. If one number does not suit both, run the translate and rotate curves separately. Raise it in small steps and compare against the buffer curve after each run.
Key Reducer Filter. Curves → Key Reducer Filter does the same job with a different algorithm and one practical advantage: Preview is on by default, so you see the result on the curve before you apply it. Its options include a Precision Mode (Absolute or Percentage), a Time Range that can be limited to a selection, and Preserve Keys by Tangent, which keeps keys with tangent types you name.
Step 4: smooth only what is still noisy
Reduction removes keys; it does not remove jitter that is larger than the tolerance. For that, the same menu has three filters:
- Smooth Filter (Butterworth): a low-pass filter. Autodesk describes it as working best on curves affected by noise.
- Smooth Filter (Gaussian): linear filtering to reduce noise on keyed channels.
- Peak Removal Filter: replaces single-frame spikes with keys averaged from their neighbours.
Use them on the channels that need them, not on the whole character. A smoothing filter cannot tell sensor noise from a fast, deliberate hit, and it will soften both.
When cleanup goes wrong
A foot that was planted now slides. The keys you removed were the ones holding it still. Undo, and reduce the contact controls (feet, a hand on a table) with a smaller Value Tolerance than the rest of the body, or leave their contact frames alone.
An arm spins between two keys after reducing. The Euler Filter was skipped or run on only one or two of the three rotation channels. Undo back past the reduction, filter all three, reduce again.
Simplify Curve removes almost nothing. The noise is bigger than the tolerance, so no key counts as redundant. Switch the method to Dense Data, raise Value Tolerance, or smooth first and reduce second for that channel.
The Euler Filter changes nothing. If the curve has no 180 or 360 degree discontinuity, there is nothing for it to rewrite. A pose where two rotation axes line up is gimbal lock, which comes from the control's rotation order and is not something a curve filter can always repair.
Keys sit between frames. Retimed or imported data can leave keys at frame 12.4. Select them in the Graph Editor and use Edit → Snap.
Where the built-in tools stop
All of this is free and does the real work. What it does not do:
- Tell you what is wrong. Nothing reports how many curves are static or how many keys a character carries before and after. You find out by looking.
- Run as one pass. Each step is a separate menu, a separate selection and, for a full character, a separate round of checking.
- Protect you from over-selecting. The Euler Filter rewrites whole curves, and Simplify Curve works on the full length of every selected curve unless you set a time range.
For one shot, that is fine. For a folder of mocap takes, it adds up.
One option: the Cleanup tab in AnimKit
Disclosure: AnimKit is my own paid Maya toolkit.
Its Cleanup tab runs the same Maya filters described above, so the result on a curve is what you would get by hand. What it adds is the bookkeeping:
- A scope switch, Selected only or Whole scene. A selection with no animation changes nothing.
- A checklist of eight operations run in order in one pass: Remove Static Keys, Euler Filter, Remove Redundant Keys, Snap Keys to Frame, Fix Pre-Infinity, Fix Post-Infinity, Clean Namespace and Delete Unknown Nodes. The last two only run on the whole scene, and only empty namespaces are removed.
- Curve Statistics: total curves, static curves, total keys, average keys per curve and namespaces, refreshed after each run, plus a result line that says what each operation changed.

The toolbar has Euler and Reduce buttons for single controls. Reduce refuses to run on whole curves: it only touches keys selected in the Graph Editor or a range highlighted on the Time Slider.
The limits: Remove Redundant Keys uses a fixed tolerance (time 0.05, value 0.001), so for a looser reduction you still open Simplify Curve yourself. There is no noise filter in the tab; for that, use Maya's Butterworth filter. AnimKit runs on Maya 2022 to 2026 on Windows only and costs $9 a month, $39 a year or $79 once (checked on 1 October 2026).
If the curves came from Mixamo, the cleanup is easier when the retarget is done properly first: see Mixamo to Maya. Once the curves are editable again, the Graph Editor tips cover what to do with them.