

Mixamo hands you a walk cycle in seconds. Then you import it next to your own character and nothing lines up: the motion is keyed on the joints of Mixamo's skeleton, and your character is animated through a rig's controls. Getting from one to the other is called retargeting, and Maya can do it with nothing extra installed. This is the full HumanIK route, the places it usually breaks, and where a dedicated tool earns its price.
What you are actually moving
A Mixamo FBX contains a joint chain whose joints are named mixamorig:Hips, mixamorig:Spine, mixamorig:LeftArm and so on, with a key on every frame. Your rig has different joint names, a different hierarchy, and controls sitting on top of the joints. Copying curves across does not work, because a Mixamo joint and your FK control do not share a rest pose or an axis orientation.
Retargeting solves that by describing both characters to a solver in the same terms (this is the hips, this is the left forearm), letting the solver drive one from the other, and baking the result onto your controls.
Step 1: download the right file from Mixamo
In Mixamo's download dialog:
- Format: FBX Binary (.fbx).
- Skin: Without Skin is enough when the motion is going onto your own rig. You only need the skeleton.
- Frames per Second: match your Maya scene. The dialog defaults to 30; a new Maya scene defaults to 24.
- Keyframe Reduction: none. You will bake anyway, and reduced keys make the source harder to check.
Step 2: import it and get both characters into a T-pose
- Open the scene with your rig and use File → Import to bring in the FBX.
- Go to the first frame. Select every Mixamo joint and set Rotate X, Y and Z to 0. A Mixamo skeleton with all rotations at zero stands in its T-pose. Do not key it; you only need the pose while you define the character.
- Put your own rig in its T-pose too. If the character was built in an A-pose, rotate the arm controls up until the arms are level.
HumanIK needs this. Autodesk's instructions say to start with the character in a T-stance, facing positive Z, Y up, with the arms along the X axis.
Step 3: define the Mixamo skeleton in HumanIK
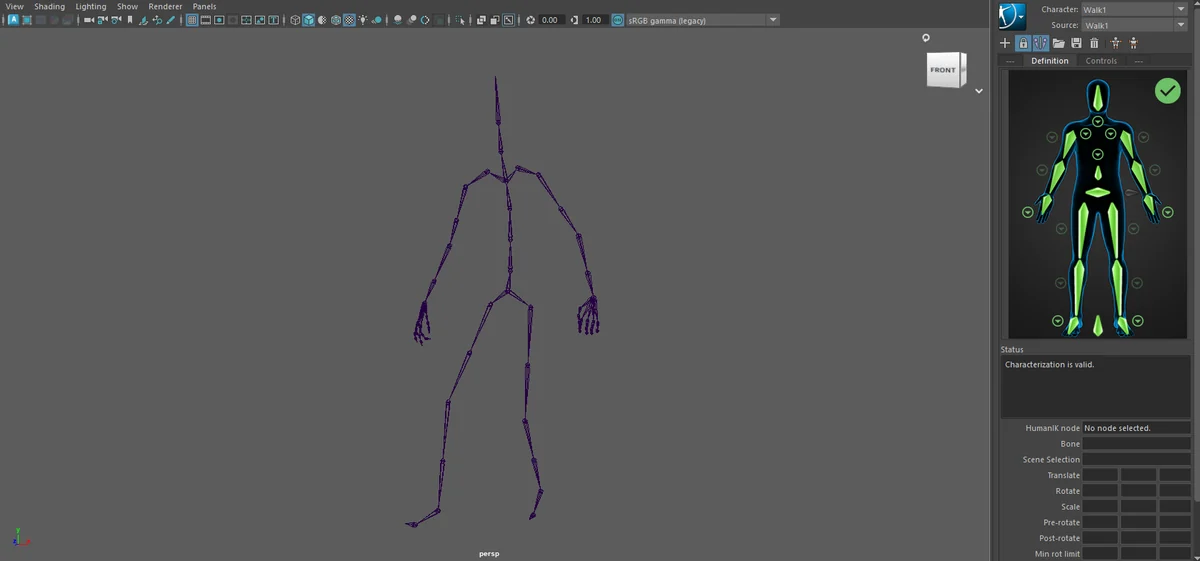
- Open Windows → Animation Editors → HumanIK.
- In the Start pane, click Create Character Definition. Rename the character to something like
Mixamo. - In the Definition tab, select a Mixamo joint in the viewport, right-click the matching cell in the character diagram and choose Assign Selected Bone. A correct assignment turns the cell green.
- Leave Mirror Matching on. When the joints follow a left/right naming convention, mapping the left leg fills in the right.
- Map at least the fifteen bones HumanIK requires: hips, spine, head, and for each side the upper leg, lower leg, foot, upper arm, forearm and hand. Add the shoulders, neck and extra spine joints for better results.
- When the validation indicator turns green, click the lock icon to lock the definition.
The procedure is documented by Autodesk under Define an existing skeleton for HumanIK.
Step 4: define your own character and map its controls
Repeat step 3 for your character's skeleton, the joints your mesh is skinned to, and name it Target.
This is where a rigged character differs from a bare skeleton. Your joints are already driven by the rig, so you cannot bake onto them. HumanIK handles this with a Custom rig mapping: with Target as the current character, open the Custom Rig tab, select one of your rig's controls, right-click the matching cell and choose Assign Selected Effector. Mapped cells turn green. Do this for the hips, spine, head, and the arm and leg controls you animate with. Autodesk's page is Create a Custom rig mapping.
The mapping is the slow part, and you do it once per rig. The Custom Rig tab's toolbar can save it as a template so the next clip on the same rig skips this step.
Step 5: set the source and bake
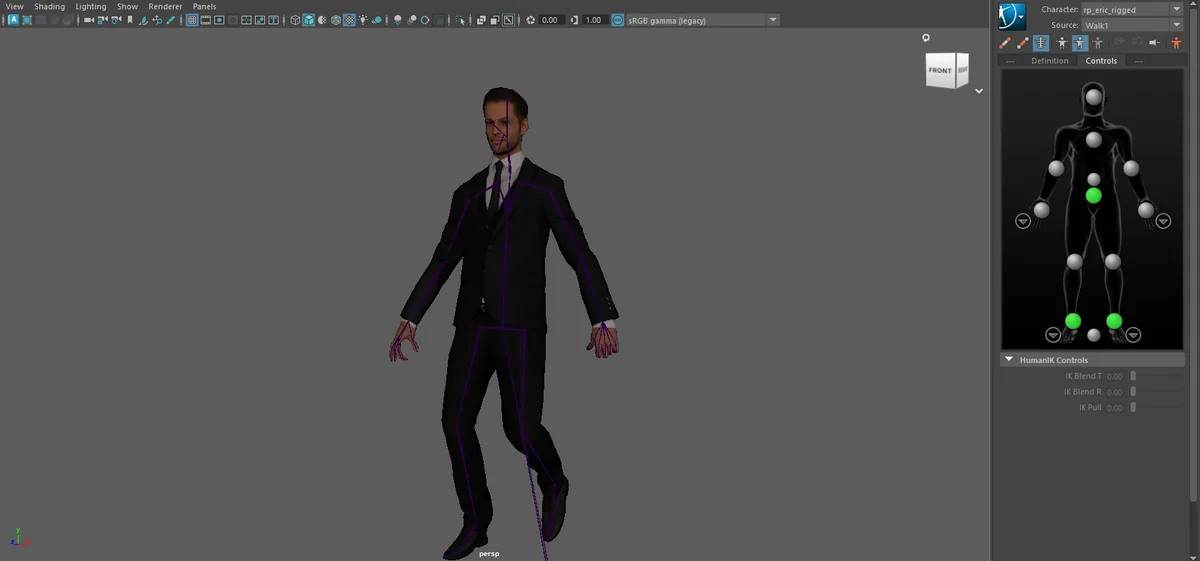
- In the HumanIK window, set Character to
Targetand Source toMixamo. Your character snaps to the Mixamo pose. - Play the clip. Check the feet, the hands and anything that crosses the body.
- Click the HumanIK menu button and choose Bake → Bake To Custom Rig. Maya sets a key on every mapped control for every frame.
- Set Source back to None, delete the Mixamo skeleton, and check that the animation still plays.
Autodesk covers the three bake targets (skeleton, Control rig, Custom rig) in Bake retargeted animation to the target character.
The failures you will actually hit
The validation indicator stays yellow or red. The character is not in a clean T-stance, or a required bone is missing. Zero the Mixamo rotations again, level your rig's arms, and look for the cell that is not green.
The arms end up raised or drooping on every frame. The two characters were defined in different poses, usually an A-pose rig against Mixamo's T-pose. The solver treats the pose at definition time as "the same pose", so the difference is baked into the whole clip. Unlock the definition, fix the pose, lock it again.
The feet slide or float. The proportions differ, and the hips are travelling the source's distance on your character's legs. Watch the contact frames after the bake and correct the hip height and the foot controls there.
Controls refuse to bake. A locked or already-constrained channel cannot take keys. Unlock it or leave that control out of the mapping.
The timing looks off after import. The FBX was exported at a different frame rate from the scene, so its keys no longer sit on your scene's whole frames. Download the clip again at the scene's rate; it is faster than repairing the timing.
The baked curves are unusable. A key on every frame on every control is normal after any bake. See how to clean up animation curves in Maya.
Where HumanIK stops
HumanIK is free, built in and good at what it does. Its costs are in setup, not quality:
- Two character definitions and a control mapping before the first clip moves.
- It maps your controls only where you tell it to. A rig with unusual control names or extra helper curves is entirely manual.
- IK controls and pole vectors need care. A foot IK control mapped loosely will slide.
- It needs a character it can describe with its required bones: a spine, a head, two arms, two legs. Anything without that layout is a different job.
If you retarget one clip onto one character a few times a year, do it this way. The mapping template makes the second clip quick.
One option: AnimKit's Retarget tab
Disclosure: AnimKit is my own paid Maya toolkit. The same retargeter is also sold on its own; both are on the AnimKit page.
It replaces steps 2 to 5. You import the Mixamo FBX, pick a preset (Custom Rig (Smart Auto-Detect) or Unreal Engine 5 Mannequin), click Scan Scene to see which control it matched to each Mixamo joint, and click Auto Retarget & Bake. The detection reads the rig itself: the skinned joints, their symmetry and which control drives each joint, with names used only as hints. The release notes for the current version record it as tested on 27 rigs.
The options are the ones that matter in the manual route: Force Mixamo T-Pose Before Bind, Match Rest Pose, Smart IK Proxy for feet and hands, and Bake to New Animation Layer so your existing animation is left alone. Locked controls are skipped and listed instead of stopping the run. Reset Rig & Clear Keys undoes a bake.
The limits: it reads Mixamo's humanoid skeleton and nothing else as a source. It runs on Maya 2022 to 2026 on Windows only. AnimKit costs $9 a month, $39 a year or $79 once (checked on 1 October 2026), with no free trial. And a scan can miss a control on an unusual rig, which is why the scan shows you the mapping before anything is baked.