

You can't fix spacing you can't see. A motion trail draws the path a control travels through the shot, with a mark on every frame, so the arc and the spacing sit in the viewport instead of being spread across three translate curves. Maya has had this built in for years, but the menu item, the options and what the trail can show all changed in Maya 2025. The steps below are split by version for that reason.
Maya 2022 to 2024: Create Editable Motion Trail
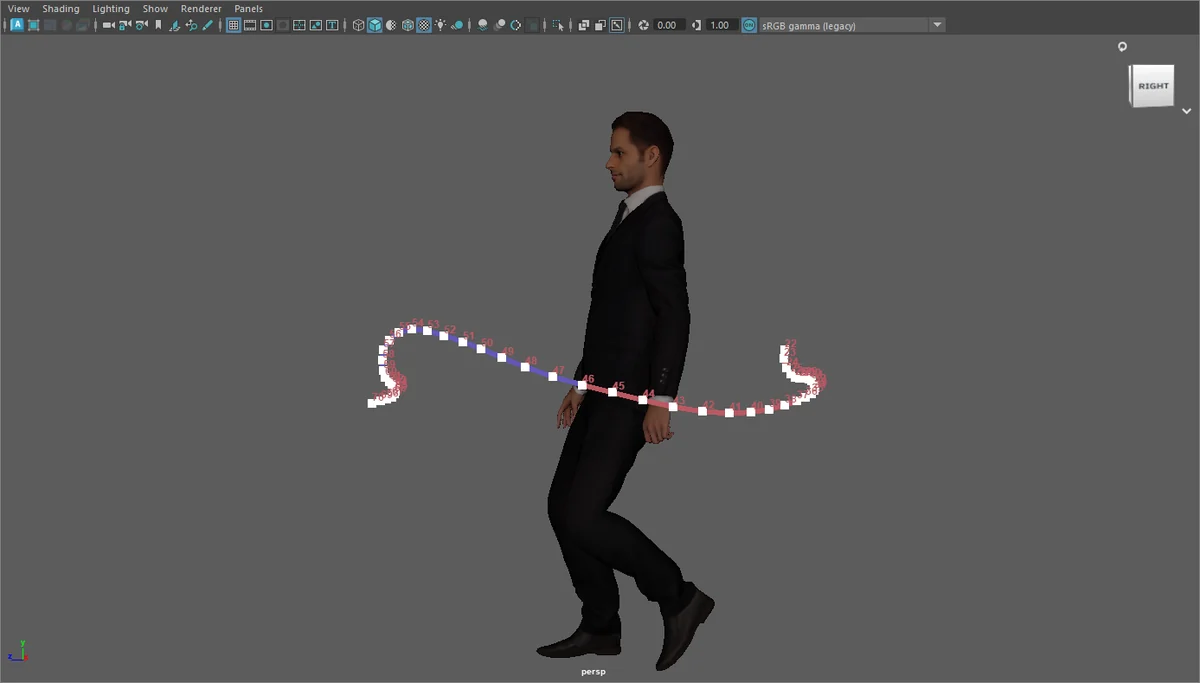
- Press F4 to switch to the Animation menu set.
- Select the control whose path you want to read: the hand IK control, the COG, a foot. Select the control, not the mesh.
- Choose Visualize → Create Editable Motion Trail. That uses the last settings. To change them first, click the option box next to the menu item.
- Set the options in the table below and click Create Motion Trail.
- Scrub the timeline. The trail is also a node in the Outliner, named something like
motionTrail1Handle.
These are the options in that window, as listed on Autodesk's Create Editable Motion Trail Options page:
| Option | What it controls | Default |
|---|---|---|
| Time Range: Start/End or Time Slider | Which frames get a trail | |
| Increment | How often the path is sampled; 1 means every frame | 1 |
| Pre frames, Post frames | How many frames before and after the current time are drawn | 0 |
| Always draw / Draw when selected | Whether the trail stays on screen after you deselect the control | |
| Trail thickness | Line width | 3 |
| Key size | Size of the key markers on the trail | 0.15 |
| Show frame numbers | Prints the frame number at each key |
The rest of the display settings live on the trail itself. Select the trail, open the Attribute Editor and look under the motion trail shape. Autodesk's motion trail properties page lists the ones that matter for reading animation: Trail Draw Mode (Constant, Past/Future, Alternating Frames), Show Frame Crosses, Show Frame Numbers, Show Keyframe Numbers and Xray Draw.
Maya 2025 and later: the Motion Trail Editor
Autodesk rebuilt the feature for 2025 and put everything in one window, the Motion Trail Editor.
- Press F4, select the control.
- Open the editor from the Visualize menu.
- Pick a Draw Style: Always Draw, Draw When Selected or X-Ray Draw.
- Pick a Draw Mode: Past/Future, Constant, Alternating Frames or Velocity.
- Set Motion Trail Direction (Before, Before and After, After) and the Pre/Post Frames counts.
- Click Create Motion Trail. The trail is added to the Motion Trail List, where an eye icon hides it and Delete Selected Trail removes it.
The same window holds the display settings: Show Key (as markers or numbers), Show Frame, Trail Thickness (default 2), marker sizes and every colour.
Reading spacing off the trail
The line shows the arc. Spacing needs the per-frame marks, so turn them on: Show Frame Crosses before 2025, Show Frame in the 2025 editor.
- Each mark is one frame. Marks packed together mean the control is moving slowly. Marks far apart mean it is moving fast.
- An ease-out is a run of marks that close up progressively. A hitch is one gap that is out of step with its neighbours.
- Alternating Frames colours every other frame differently, which makes it possible to count frames along a long arc without losing your place.
- Velocity, new in the 2025 editor, colours the trail as a heat map: one colour where the control is slow, another where it is fast, a gradient between.
Before 2025 there is no colour for speed. You read it from the gaps.
Editing keys on the trail
The trail is editable, which is the point of the name.
In Maya 2022 to 2024, right-click the trail and choose Modify Keys. Select a key on the trail and move it with the Move tool (W); the path bends and the translate curves update. For tangents, select a key, right-click and choose Show In Tangent or Show Out Tangent, then move the tangent handle. Autodesk documents this under Modify keys or tangents on a motion trail.
In Maya 2025, turn on the key markers in the editor's display settings (Show Key), click a key on the trail and move it with W.
Two limits come straight from Autodesk's documentation: the trail only displays keys for the object's Translate X, Y and Z curves, and when those attributes are on animation layers only the keys on the active layer are shown and editable.
When it goes wrong
The trail vanishes when you click something else. It was created with Draw when selected. Switch it to Always draw.
You can see the path but there are no keys on it. This is the translate-only limit. An FK hand has no translate keys of its own; its motion comes from rotations further up the arm. You get the path, which is still worth having for the arc, but nothing to drag. Fix the arc on the rotation curves, or switch that limb to IK for the pass.
The trail follows the wrong point. A trail is drawn at the pivot of the control you selected. If you care about a fingertip or the tip of a nose, the control's pivot is at the wrist or the neck. Before 2025, parent a locator under the control, move it to the point you want to watch and create the trail on the locator. In 2025, set Local Position to Custom in the editor, which takes a position in the object's space.
Editing gets sluggish. A trail needs the control's position on every frame it draws, so the rig has to be evaluated across that range whenever the animation changes. On a heavy character, draw a window instead of the whole shot: set Pre frames and Post frames to something like 10 each, or raise Increment. Delete trails you have finished reading. Before 2025 that means selecting motionTrail1Handle in the Outliner and pressing Delete; Ctrl+H hides it and Shift+H brings it back.
The arc is clean in perspective and wrong in the shot. A trail is drawn in world space. What the audience sees is the arc through the shot camera, and a moving camera changes it. Check the trail through the shot camera before you polish it. The 2025 editor has an Anchor setting (World, Object or camera) for this; the older option window has Use Anchor Transform.
Where the built-in trail stops
- On Maya 2024 and earlier there is no speed colouring. Alternating Frames helps you count, but you still judge speed by eye.
- On those versions the settings are split between the option window and the Attribute Editor.
- Keys can only be edited on the trail for translation. Rotation-driven motion can be seen but not adjusted there.
- The trail shows one point per control. Reading how a whole limb moves means one trail per control.
If you are on Maya 2025 or 2026, the first two are solved and you probably need nothing else.
One option on older versions: AnimKit's trail tab
Disclosure: AnimKit is my own paid Maya toolkit, so weigh this section accordingly.
Its Motion Trail tab creates a trail on the selected controls with sliders for the frames before and after the current frame and a checkbox for frame numbers. The part that is different from Maya 2024's trail is Colour by Spacing: it measures how far the control travels on each frame and drops a coloured marker per frame, red for the slowest frames in the range, yellow in the middle, green for the fastest. It runs on Maya 2022 to 2026, so it gives you speed colouring on the versions that do not have Velocity mode.
The limits: the colours are sampled when you create the trail, so after you change the animation you create it again. AnimKit is Windows only. It costs $9 a month, $39 a year or $79 once (prices checked on 1 October 2026), and there is no free trial. On Maya 2025 or later, use the built-in Velocity mode instead; it does the same job and updates with the animation.
Once the trail shows you where the spacing breaks, the fix is usually in the curves: see the Graph Editor tips and, for baked or mocap data, how to clean up animation curves.