

Photographing a book page and photographing a sheet of paper are not the same task, and the difference is why most book scans come out unreadable. A book fights you in three specific ways, and each one has a fix that takes seconds once you know it.
The three things that ruin book scans
The page curves. Paper near the spine bends away from the camera. Text on the curve stretches, blurs, and defeats OCR — so a scan that looks fine at a glance turns into gibberish when you try to search it.
The gutter throws a shadow. The valley between two pages catches a dark band down the inside edge. Auto-contrast then does the worst possible thing: it darkens the whole page trying to average that band out.
Order collapses at volume. Fifty pages is a hundred shots. Get distracted once, photograph 47 twice and skip 48, and you find out forty pages later.
Every technique below exists to solve one of those three.
Flatten the page before you shoot
Almost all of the quality problem is solved before the camera comes out.
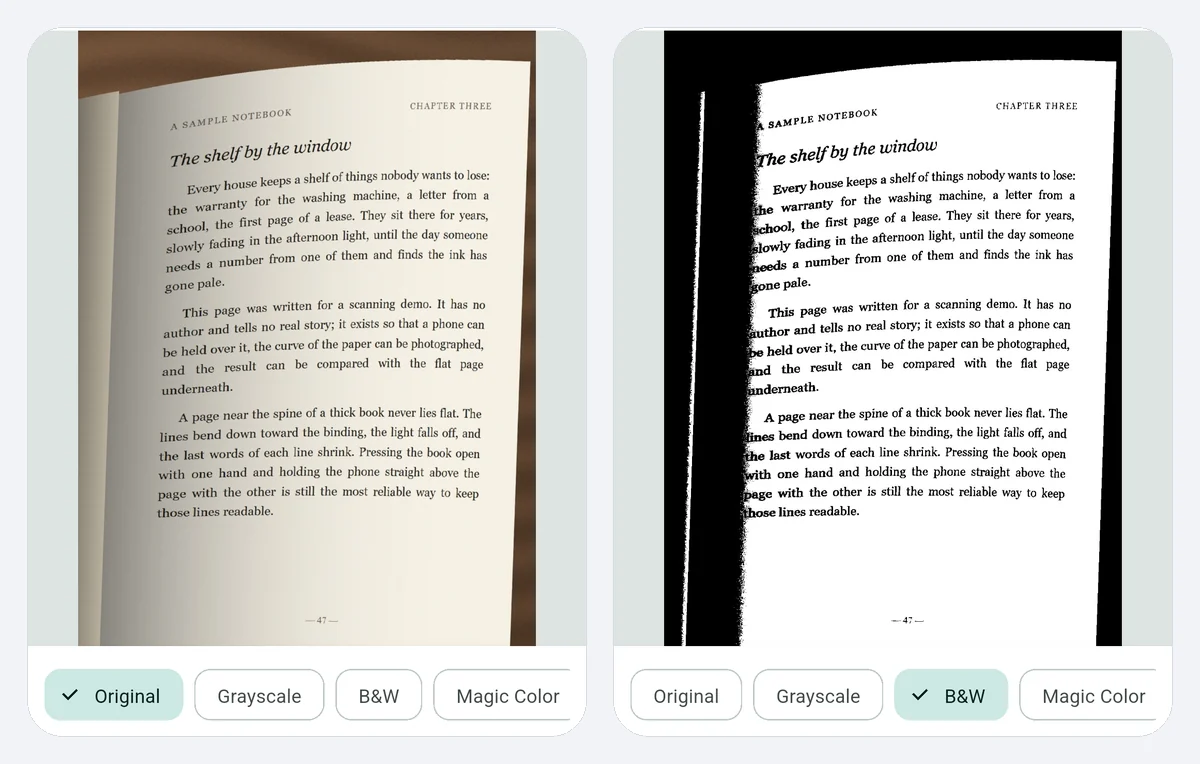
- Press the book open flat. A hand at the outer edge of each page, or two small weights, is enough. If the book will not open flat, shoot one page at a time and let the other half stay curved out of frame.
- Shoot one page per frame, not the spread. The temptation with a big book is to capture both pages at once. Don't. One page fills more of the sensor, sits flatter, and crops cleanly.
- Hold the phone parallel to the page, not tilted. Tilt is what produces trapezoid pages that edge detection has to guess at.
- Get the light from the side you are not shooting from. A window to your left while you shoot from above works. Directly overhead light puts your own shadow on the page; a lamp behind the phone puts a glare disc in the middle of it.
Paperbacks with a tight spine are the hard case. Bend them slightly past flat before you start — or accept that the inner margin will curve and leave a wider crop there.
Capture the whole book in one pass
This is where a scanner app earns its place over the camera roll. A camera gives you 200 loose images with timestamps; a scanner gives you a document.
The workflow that survives a long book:
- Start one multi-page document, not one per page. Every page you capture appends to the same file, so order is recorded as you go rather than reconstructed afterwards.
- Let edge detection do the cropping. A scanner finds the page boundary and flattens the perspective, which is the part that fixes tilt.
- Check every tenth page, not every page. Enough to catch a drift in framing, not so much that you lose the rhythm and skip one.
- Re-shoot immediately, never later. A page you flag to redo at the end is a page you redo at the end of a session you have lost patience with.
- Run OCR once, at the end, over the whole document. Not per page.
That last step is what separates a stack of pictures from something useful. DocFlow Scanner — the Android app we build — captures pages into one document, detects edges, and runs Arabic and English OCR on the device, so a scanned chapter becomes text you can actually search, with nothing uploaded. Export lands as PDF, Word or Excel. Capturing the pages is free; the OCR and every export are part of DocFlow Pro, a monthly or yearly subscription or a one-time lifetime purchase. The general multi-page mechanics are covered in scanning multiple pages into one PDF.
Make it searchable, not just a picture
A PDF of page photographs is a PDF of pictures. You cannot search it, quote from it, or copy a line into your notes. For a novel that may be fine. For a textbook, a manual or anything you are going to cite, it defeats the purpose of scanning it at all.
OCR is the step that converts it, and books are unusually kind to it: printed type, consistent font, high contrast. That is the easiest input OCR ever gets, so the accuracy you see on a book will be better than the same tool on a receipt or a handwritten note.
Two things still trip it:
- Curved text near the spine fails more than anything else on the page. This is the payoff for flattening properly.
- Two-column layouts can be read in the wrong order — across both columns instead of down one. Check the first page of any multi-column book before you commit to the rest.
For the specifics of pulling text out afterwards, see extracting text from an image on Android.
Keep the file a sensible size
Two hundred full-resolution page photographs makes a PDF nobody can email. A few habits keep it manageable:
- Use the scanner's document mode rather than raw photos. It writes a page-sized image, not a 12-megapixel camera file.
- Black-and-white or greyscale for plain text. Colour triples the size and adds nothing to a page of black type. Save colour for pages with images or coloured diagrams.
- Compress at the end, not per page, so quality is judged once across the whole document. The PDF compression walkthrough covers getting under an email limit without turning the text to mush.