

Plug your laptop into the projector, open the 3D Anatomy Atlas in the browser and press Present. The model fills the wall, and any structure you tap appears along the bottom of the screen in large type, in English, Latin and Arabic. The full skeleton is free with every tool, Present mode and the quiz included, and nobody has to sign up.
This guide is for lecturers, demonstrators and teaching assistants who want a 3D model in front of the whole room instead of a flat atlas page. It covers the setup, what students in the back row will see, a lesson flow that suits a projected model, the class quiz, and the checks to run before the lecture.
The 5-minute setup
- Connect the laptop. Run an HDMI cable from the laptop to the projector or TV. On Windows, press Win+P and pick Duplicate, so your screen and the wall show the same picture. On a Mac, turn on mirroring in the display settings. No cable? Open Chrome's menu, choose Cast, select the TV or projector and cast the tab.
- Open the atlas. Go to the free 3D skeleton in the browser. The skeleton loads first, with no account and no card.
- Pick your systems. The chips along the bottom (Skeleton, Muscles, Joints, Heart & vessels, Nervous, Organs, Lymphatic, Regions) switch each system on and off. Turn on the ones for today's lecture and let each one finish loading.
- Press Present. The browser goes fullscreen. The search bar and the name card disappear, and the tool buttons shrink to faint icons in the corner.
- Leave with Esc or with the screen icon, the same button that started the presentation.
If you chose Extend instead of Duplicate, drag the browser window onto the projector's screen before you press Present. Fullscreen opens on the screen that holds the window.
Until you touch it, the model turns slowly on its own. That gives you a calm opening slide while students find their seats.
What the room sees
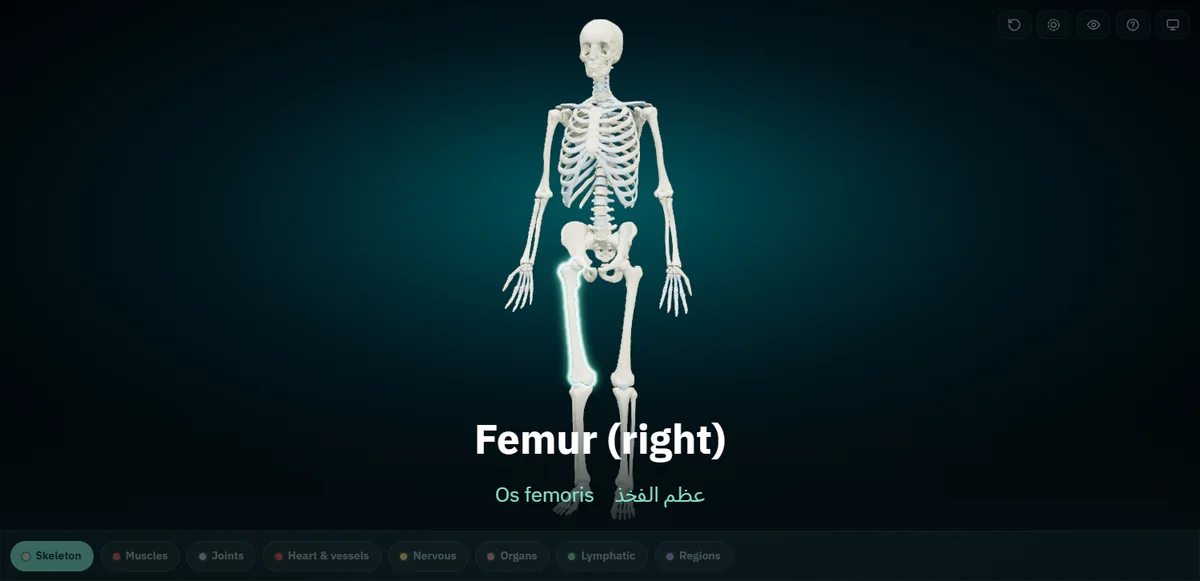
Tap a structure in Present mode and two things happen. The structure glows on the model, and its name fills the bottom of the screen: the English name in large white type, the Latin and Arabic names below it. You can stop spelling Os femoris on the whiteboard, because the back row can read it on the wall.
The label "(right)" means the body's right side, which sits on your left when the model faces the class. That is the anatomical convention, and first-year students need to hear it said out loud the first time they see it.
The tool icons and the system chips stay on screen at low contrast and brighten when you move the pointer over them, so they don't compete with the model. Drag to turn the body, scroll to zoom, and double-click a structure to fly the camera in to it. On a touch screen, pinch to zoom and double-tap to fly in.
A lesson flow that works on a projector
Four moves cover most of what you want to show about one structure: where it sits in the body, what it looks like alone, what lies around it, and what it is called.
Start from the whole skeleton
Open on the full skeleton in front view and turn it so the room can orient. Students see where today's region sits in the whole body before you zoom in on it. The Reset icon brings the camera back to this view whenever you lose your bearings.
Isolate the structure
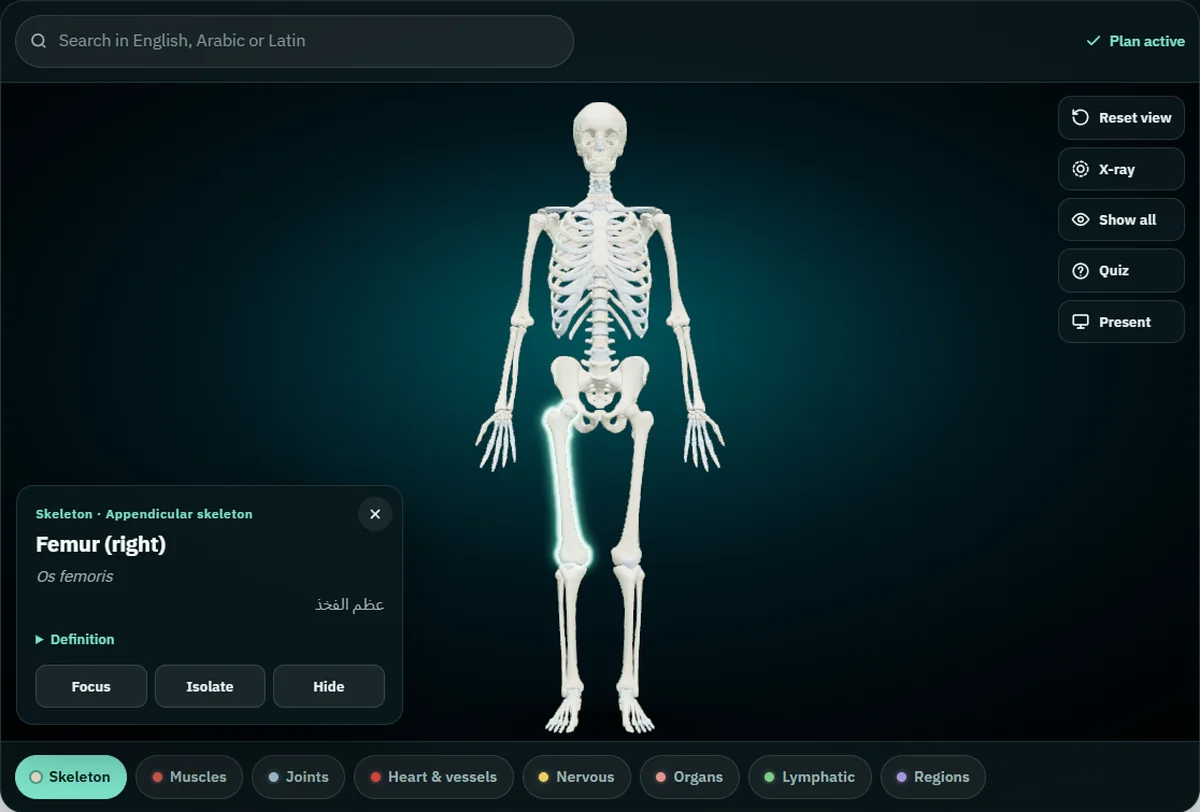
Click a structure and its name card opens with three buttons. Isolate keeps only that structure on screen and flies the camera to it. Hide removes anything that blocks the view. Focus flies in without hiding the rest of the body. Above the names, the card shows the system and the group, here Skeleton and Appendicular skeleton.
Present mode hides the name card. Isolate before you press Present, or step out with Esc, isolate, and press Present again. It takes two seconds and the class barely notices.
Turn on X-ray to show depth
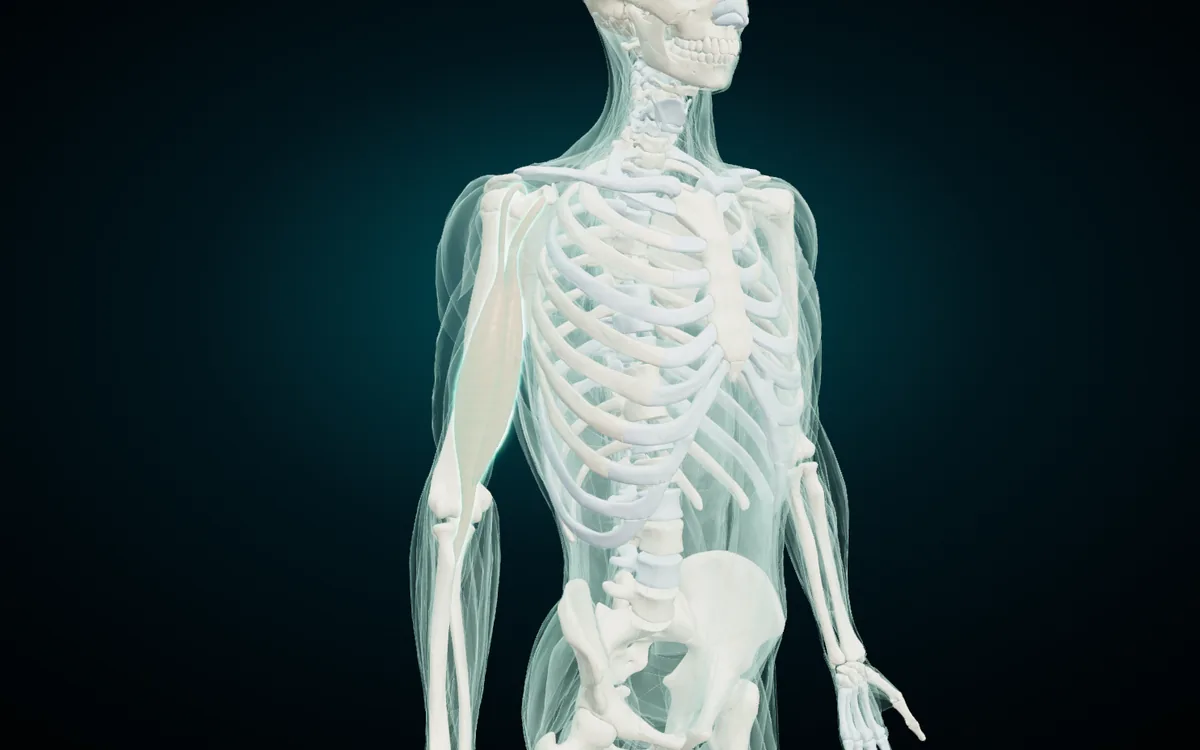
X-ray turns the body to frosted glass. Combine it with Isolate and your structure stays solid while the rest of the body shows as a glass outline around it. Students see the femur inside the shape of the thigh, or the biceps lying over the humerus, instead of a bone floating on a dark background. With the muscles and the skeleton both switched on, the muscles become a see-through layer over the bones, as in the picture above. The muscle system needs the paid plan; X-ray itself works on the free skeleton.
Name it in three languages
The atlas names its structures in English, Latin and Arabic and marks left and right. In a class that mixes languages, the caption serves everyone at once: students who learned in English, students who revise in Arabic, and the Latin your examiners expect. The search box accepts any of the three, so a student who calls out عظم الفخذ or os femoris gets the same bone. Search sits in the top bar, which Present mode hides, so look structures up before you present or during a quick step out.
The Arabic version of the atlas reverses the order: the Arabic name in large type, English and Latin below. If most of your students study in Arabic, project that page instead.
For a handout, the article on the bones of the human body with their English, Latin and Arabic names lists the main bones with the same names the atlas uses. The guide to the muscles of the human body and their Latin names does the same for your muscle sessions.
Run the class quiz on the big screen
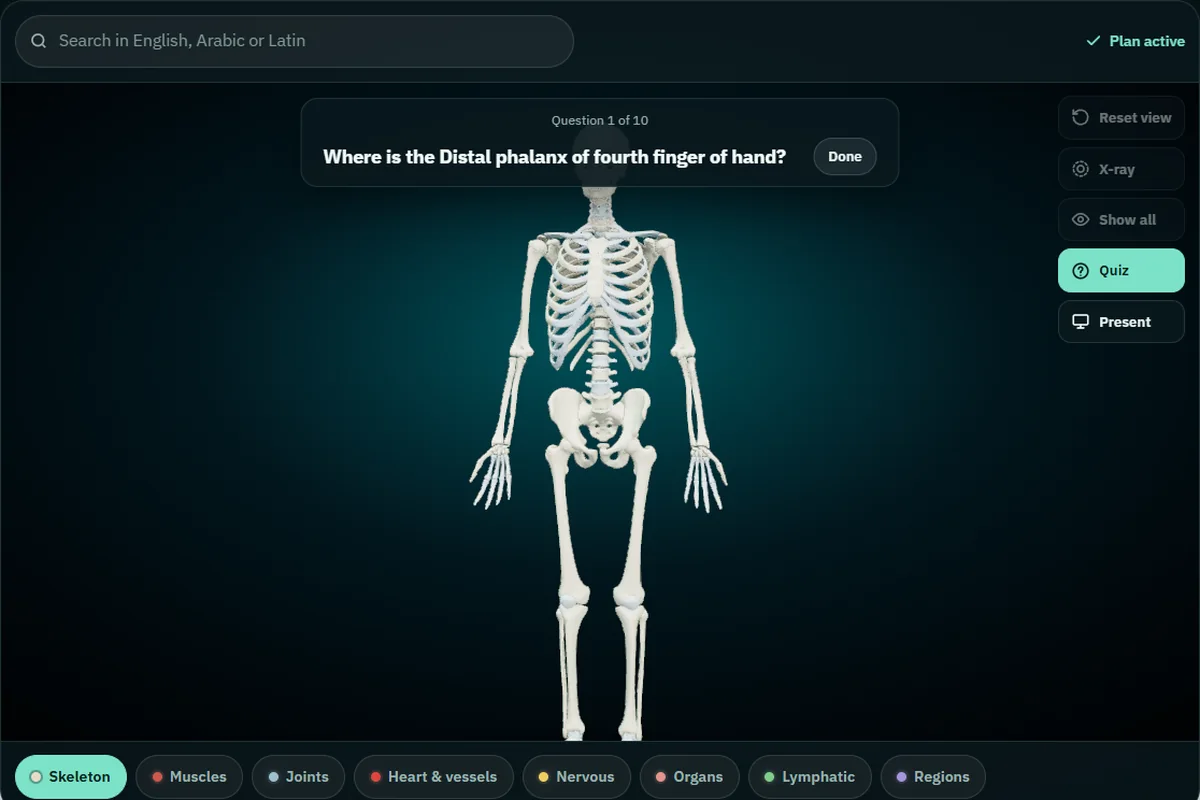
The quiz asks ten "Where is the…?" questions, drawn at random from the structures on screen. On a projector it becomes a room activity.
- Set the scope. Show only the systems you have taught and hide structures you have not covered yet. The quiz needs at least four structures on screen to start.
- Press Quiz. X-ray switches off and the first question appears at the top of the screen. In Present mode the question is set in large type.
- Read the question aloud and give the students time to answer. They can point at the wall, call it out, or write it down first.
- Tap the structure the class chose. A right answer shows "Correct" and lights the structure up. A wrong answer shows the name of the structure you tapped and lights up the right one, so the whole room sees where it is before the next question.
- Read the score. After ten questions the screen shows the score out of ten, with Again for a fresh set and Done to go back to the model.
The score counts your taps, so it becomes the class's score when you tap the class's answer. Ten rounds split cleanly into two teams of five questions each.
On the full skeleton a question can land on a small bone, like the finger phalanx in the screenshot. Count those as bonus questions, or press Again for a new set.
Checks before the lecture
| Check | Why it matters |
|---|---|
| Test the projector with your own laptop, cable and adapter | You find the right input and the right adapter before students arrive |
| Load every system you need on the teaching computer beforehand | The models download on first use, about 10 MB for all eight systems; after that the browser keeps them for the next visit |
| Make sure the room has an internet connection | The web atlas needs a connection to open; it does not run offline |
| Teaching from a department computer? Paste your licence key there too | A plan opens every system in the browser where you activate the key, and the same key works in your other browsers |
| Mute notifications | Duplicate mode puts everything on your screen onto the wall |
| Dim the lights near the screen | The viewer uses a dark background, which washes out in a bright room |
The prices, stated plainly. The whole skeleton is free: 277 structures, teeth and costal cartilages included, with every tool, Present mode and the quiz, and no account. Muscles, joints, heart and vessels, nerves, organs, the lymphatic system and body regions need a plan at $4.99 a month or $24.99 a year, paid through Gumroad, cancel any time. Gumroad emails you a licence key, which you paste under "Already subscribed?" in the viewer.
When the phone is better
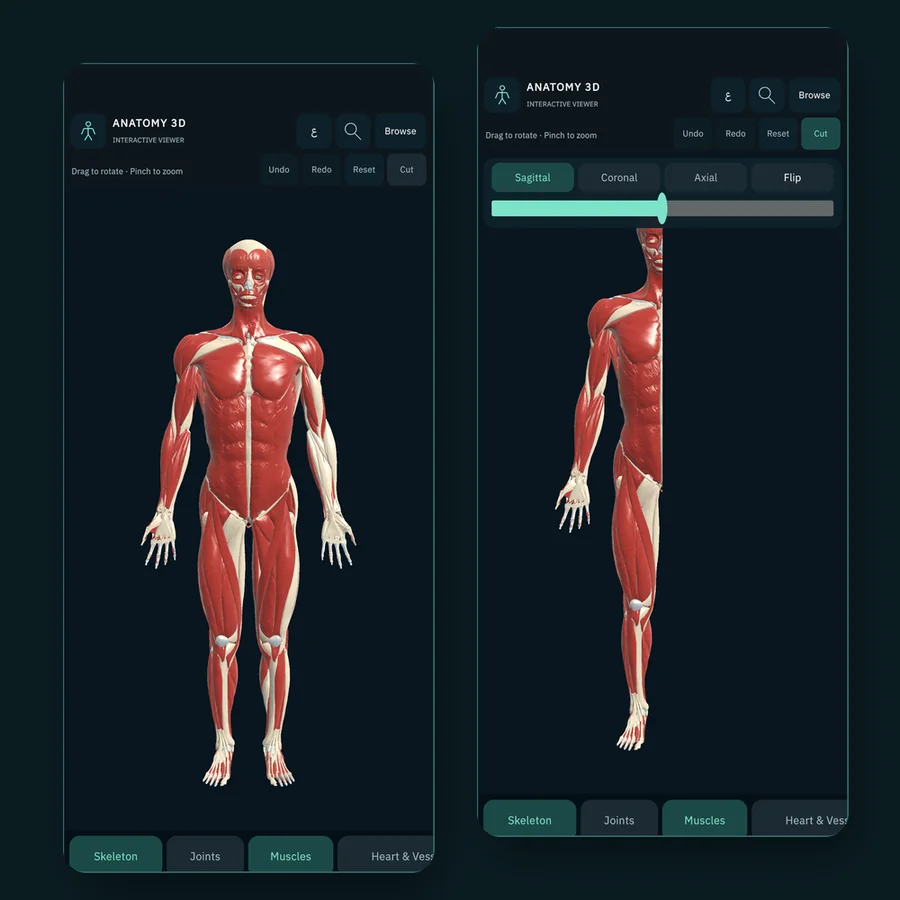
Some rooms have no laptop, no reliable Wi-Fi, or a small group around a dissection table instead of a full lecture hall. For those, use the Anatomy 3D app for Android. It carries the same models and the same English, Latin and Arabic names, and it works offline once installed.
The app adds tools the web atlas does not have:
- Cut planes on three axes (sagittal, coronal and axial), to slice the body and show a section.
- Muscle origins and insertions, for the questions that follow every muscle lecture.
- Mirroring to a TV, for a seminar room with a screen and no computer.
Purchases in the app are separate from the web plan. The Anatomy 3D app page has the full details.
Start with the free skeleton
Before your next lecture, open the 3D Anatomy Atlas on the laptop you will teach from, connect it to the projector, press Present and run one quiz on yourself. Ten minutes in an empty room shows you how the model reads from the back row. For small-group teaching with the model in your pocket, install Anatomy 3D from Google Play.
3D renders: NasrTech, from Z-Anatomy models (CC BY-SA 4.0). The lecture hall in the top image is an illustration; the screen in it shows the real viewer.